Sunday, August 7, 2016

Service Principal Name (SPN) Register and De-register in AD

Description:

A service principal name (SPN) is a unique identifier of a service instance. SPNs are used by Kerberos authentication to associate a service instance with a service logon account. This allows a client application to request that the service authenticate an account even if the client does not have the account name. 

Cause or Reason:

Before the Kerberos authentication service uses an SPN to authenticate a service, the SPN must be registered on the account object that the service instance uses to log on.

Resolution:

(1) To create /register an SPN for the FQDN of the SQL Server use the following command:

setspn -A MSSQLSvc/SQL_Server_FQDN:1433  Domain\Account

For example:
  
setspn -A MSSQLSvc/HOSTNAME.domain.com:1433 Domain\service-account

(2) To create /register SPN for web application (IIS, Sharepoint etc.) use the below commands:

 setspn -S HTTP/webappurl.domain.com   Domain\service-account

(3) To verify the SNP use the following command:

setspn –L  domain\SQL Service Account

For example:

setspn –L Domain\service-account 

(4) To delete /de-register SNP for the FQDN of the SQL Server use the following command: 


setspn -D MSSQLSvc/SQL_Server_FQDN:1433 Domain\Account


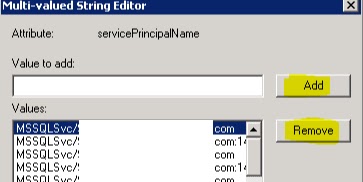
(5) Alternatively, these tasks can be performed through ADSIEDIT. Connect to default naming context, navigate through the service account, select attribute servicePrincipalName and click Edit. Be very careful as ADSIEDIT is low level editor and could impact the environment if not handled properly.


(6) Now we can add or remove the SPN associated with the service account.


Monday, February 8, 2016

How To Dual Boot Using Virtual Hard Disk (VHD)

PART  I: Converting an ISO image to VHD file

Introduction:

Very often we require to have a dual boot system, maybe for some study purpose or for some training purpose. For a physical machine in which Secure Boot (UEFI) is enabled, is very difficult to make it a dual boot system. Using a Virtual Hard Disk (VHD) it is easy to make a dual boot system in UEFI (replaces BIOS). Nowadays OEM pre-installed OS comes with these security features.

A brief introduction to UEFI (Unified Extensible Firmware Interface)


  • UEFI allows firmware to implement a security policy

  • Secure boot is a UEFI protocol not a feature of OS

  • UEFI secure boot is part of Windows 8 secured boot architecture

  • Windows 8 utilizes secure boot to ensure that the pre-OS environment is secure

  • Secure boot doesn’t “lockout” operating system loaders but is a policy that allows firmware to validate the authenticity of components

  • OEMs have the ability to customize their firmware to meet the needs of their customers by customizing the level of certificate and policy management on their platform

  • Microsoft does not mandate or control the settings on PC firmware that control or enable secured boot from any operating system other than Windows.


  • Why convert an ISO to VHD?

    Using an ISO image virtual machines can be made bootable but not the physical machines. VHD files can be used for booting a physical machine. For this reason, we need to have an OS in VHD format, either we can directly download the OS in VHD format or we can convert an OS in ISO format to VHD format.

    How to convert an ISO to VHD?

    (1) Download windows image converter script (Convert-WindowsImage.ps1) from the following link

    (2) Put the file in the root directory, preferably C:\
    (3) Right-click on the file, click on properties, and then unblock it.


    (4) Login as Administrator or run the PowerShell in admin mode.
    (5) Change the execution policy to 'RemoteSigned'.


    (6) Now run the following command to show GUI mode

    (7) Now GUI will open:


    (8) Select source file (ISO file), OS Edition (SKU), VHD type, size, working directory, and then click on 'Make my VHD'.


    (9) Wait for few minutes until you get confirmation


    (10) Your VHD is ready now. You can find it in the root directory/ working directory. In this case at C:\


    Note: This script is tested with Windows 8, Windows 8.1, Windows Server 2012, and Windows Server 2012 R2.


    PART - II: Mounting VHD file and making it dual boot

    (1) Open disk management console (Run->diskmgmt.msc) click on Action and select Attach VHD


    (2) Browse for VHD file (in this case C:\)


    (3) Now the VHD will be mounted on a drive (In this case K:\)


    (4) Run command prompt as Administrator and create boot file for K:\Windows


    (5) To edit the boot options download EasyBCD2.2 and edit the boot option


    (6) Restart the system and you are done :)